|
March 2012
Dry-Rubbed Pastrami Recipe
Time: 3-12 day dry-brine (see note, depends on thickness)
4-10 hours smoking
1-2 days resting in fridge after smoking
Steam for one hour, then slice and enjoy!
 Pastrami is basically corned beef that is smoked and then steamed. Barbecue, with a Jewish accent.
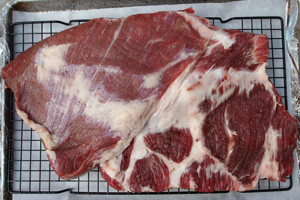
The traditional cut for pastrami is beef navel. Navel (or “plate”) is an inexpensive but flavorful marriage of fat and muscle. While few butchers handle this cut today, most kosher meat markets are glad to oblige. Alternatively, seek out the “point” from a beef brisket- avoid the “flat” of the brisket, which is sold in most supermarkets for corned beef. It’s too lean for pastrami unless you buy prime.
Poor immigrant families huddled on the lower east side of New York lacked hot water, let alone refrigeration, so chemically preserved meats were the best method to prevent spoiling. A typical pastrami recipe begins by preparing corned beef in a salt brine containing nitrites- this helps preserve the meat and is responsible for its iconic pink color. (In medieval times, salt was often sold in the form of small pellets referred to as “corns”, and thus the name). A wet salt brine penetrates every nook and cranny of the navel, but it’s difficult to know how much is ultimately absorbed, so corned beefs tend to be excessively salty as a precaution against spoilage.
After a week in the “corning brine” you wash out the excess salt, rub with a black pepper and coriander blend, and smoke until the meat is fully cooked and free of bacteria. Finally, the meat is steamed into tenderness, while rendering out much of the excess fat.
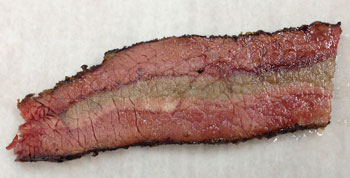
You might wonder if a week soaking in brine is really necessay. It turns out nitrite ions move very slowly through meat- if you brine for just 18 hours, this striped pastrami is your reward1:
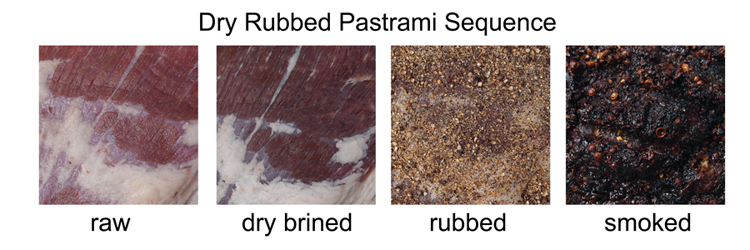
Our recipe employs a dry brining method, which is faster and less messy, but requires refrigeration (which the early Jewish immigrants lacked). Plus, its easier to control finicky salt and nitrite levels in a dry than a wet brine- every salt atom deposited on the surface ends up inside. But dry brining demands attention to detail, as well as a source of clean, fresh meat.
- Start with 8 lbs of beef navel, trimmed of most surface fat. Depending on the steer, this may consist of one or two hunks of meat around a foot on a side, and 1 ½” thick. Alternatively, you can smoke a brisket point- remove most of the surface fat, and carve out any thick, dense seams of intramuscular fat- this dense fat will never fully render.
- Make up a mixture of TWO volumes of Pink Curing Salt #1 (also known as Prague Powder #1) to ONE volume of fine grain (or regular table) salt, and store for use in a tightly closed container. This ratio2 will produce a dark pastrami color and just the right amount of saltiness. Then measure out 1/4 tsp of the mixture per pound of meat (e.g. 2 level tsps for an 8 lb navel).
- Better yet, use our curing salt calculator which generates a more accurate estimate for curing time and curing salt amounts.
- Wearing gloves, UNIFORMLY sprinkle the salt/nitrite mixture on both sides of the navel. The trick is to sprinkle 10% on one side, flip over, sprinkle another 10%, flip, etc. The best way to sprinkle the powder is with a spoon- tap the handle of the spoon and small amounts of salt will bounce out and onto the meat. Make sure the salt/nitrite mixture is dry (so it doesn’t clump), and sprinkle from a foot or so above the meat. Apply a bit more in the thicker areas.
- Place on a wire grate above a sheet pan, cover with plastic wrap, and refrigerate for 24 hours. Our experiments on salt diffusion demonstrated that nitrite will have penetrated almost all of the way through the beef navel after two days. During cooking, it will finish diffusing.
- On day 2, prepare the pastrami rub (adapted from AmazingrRibs.com). For 8 lbs of meat, combine in a spice grinder set on “coarse” (or just pour in a plastic bag and crush with a rolling pin)
- 8 Tbs of black pepper corn
- 5 Tbs of coriander seed
- 2 Tbs of mustard seed
after grinding, mix in
- 2 Tbs brown sugar
- 2 tsp garlic powder
- 2 tsp onion powder
- Coat both sides of the meat with a thin layer of the rub. Press in firmly. Save any extra rub for another batch.
- Place on a wire grate above a sheet pan, cover with plastic wrap, and refrigerate for another 24-48 hours minimum, or follow the curing calculator.
- Set up your smoker at 225F. Most hardwoods are fine- I prefer a mix of apple and hickory.
- Place the meat in the smoker, fattier side up. If one end of the beef navel is an exceptionally thin flap, fold under and slice along the bend, so the entire slab is around the same thickness.
- How long should you smoke the meat? Traditionally, pastrami is cold smoked for a few hours (which helps develop its black crust), and then hot smoked a few hours longer. But if you don’t own a cold smoker, don’t worry. After 3 hours of hot smoking much of the flavor is already deposited- you can actually finish cooking in a kitchen oven. The crust will simply be light brown. However, for additional flavor and to darken the crust, I prefer to smoke for around 8-10 hours at 210F. But any of these smoking methods will end up tasting amazing.
- Cook until the center reaches 180F, but any temperature between 165F and 190F will do. Normally I cook pork butt to 192F- this assures the collagen has broken down to gelatin and the meat is tender. But time, temp and humidity all play a role in this conversion. 14 hrs smoking at 200F gives similar results to 10 hrs at 235F, even though the internal temperature will be lower. Lower temperatures will lead to a slightly firmer pastrami, higher to falling-apart slices.
For pastrami, where you steam the meat for an hour or two after smoking, the steaming finishes the conversion, so you can stop smoking in the mid 170F’s to low 80's. It's the Jewish "texas crutch".
THERE IS NO SUBSTITUTE FOR AN ACCURATE DIGITAL THERMOMETER3. Depending on humidity in the oven and in the air, the brand of smoker, and if your meat “stalls”, cooking time will run from 6-12 hours. Longer for the point brisket, shorter for the navel.
Note the significant advantage of pastrami over barbecuing ribs or brisket- if smoking runs late into night, angry family members aren’t waiting on dinner. Which is scheduled two days later, one hour after steaming. Think of pastrami as a delicious way to save your marriage….
- Let cool, then refrigerate for one to two days wrapped in plastic. This helps consolidate the rind and allows juices to redistribute evenly.
- You can freeze excess pastrami at this point. Vacuum sealed bags are particularly effective.
- When ready, set up a steamer basket in a large pot.
- Steam for 1 ½ to 2 hours4. Make sure to check the water level occasionally so the pot doesn’t run dry. Much of the fat will render out during the steaming. You can tell the meat is done when its fork tender (around 203F)
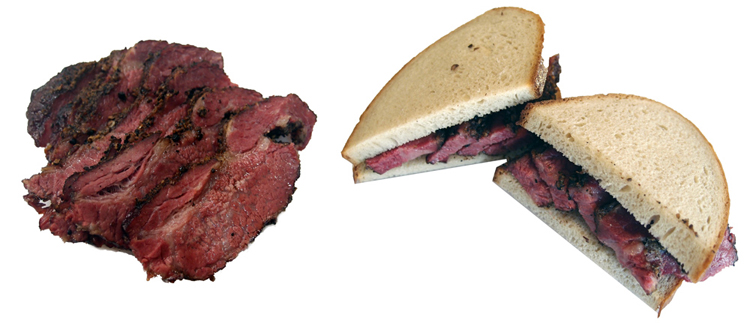
- Slice across the grain, thick or thin. Pile high on real rye bread, add mustard if you prefer, and enjoy!
|
|
|
--------------------------------------------------------------------------------------------------------
1 If you inject curing salt into the brisket in isolated spots using a hypodermic needle, and cure for just a day, you will create polka dot pastrami. Fun, but freaks out most diners....
2 The legal limit for sodium nitrite in cold cuts is around 156 ppm (200 ppm injected in muscle), but averages closer to 120 ppm in most products on the supermarket shelf. Unfortunately, a 200 ppm level results in pink, "ham" color, and since we are not using the nitrite for preservation, the color from a lower nitrite level is more traditional. This recipe is closer to 140 ppm.
3 If you don't own a good digital thermometer, or refuse to use one on general principles, I let the meat tell me when its time- at some point the meat’s surface transitions from dry to punctuated by small rivulets of oozing gelatin. Like hitting “medium” by noticing when a hamburger’s juices move from bloody red to a mixture of clear/pink. Time to stop cooking
4 You can sous-vide instead of steaming. Use less rub, or the braising liquid inside the bag will over-flavor the meat.
|


