| g e n u i n e i d e a s | ||||||
 |
 |
 |
 |
 |
 |
 |
| home | art and science |
writings | biography | food | inventions | search |
| rye time | |
|
Feb 2012
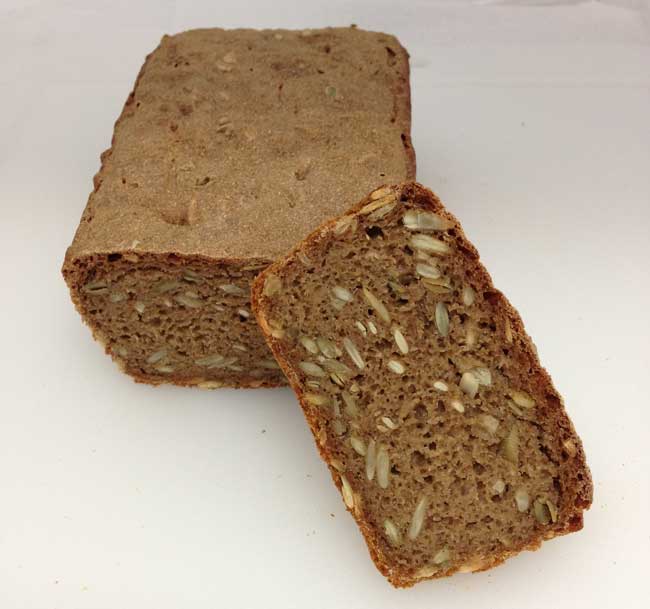
Great rye bread is chewy, dense, sour, nutty and filling. In America, few people have tasted authentic rye bread, but in Scandinavia it is a national staple. No, that is a disservice to the hallowed role it plays as part of their national identity. Rye bread is eaten daily by everyone from toddlers to senior citizens. I can think of no similar food in the American pantheon. Rye bread (Rugbrød in Denmark) is a no-knead sourdough loaf. And, like most sourdoughs, the leavening is obtained from a yeast brew revived daily. This "starter" may have been fed and nurtured by a family for generations, the exact strain reflecting the local air, water and environment. Everyone can claim their bread is the most authentic. But what if you only want to eat a loaf now and then? This recipe is intended for people who might bake Rugbrød a couple of times a year. Realistically, you won't have access to a mother batch of yeast bubbling on the counter, nor do you have the time to attract and nurture a sourdough mother out of thin air. So, this recipe will teach you how to create a sourdough starter from a commercial source, and nurture it for a few weeks while the rye bread urge keeps you baking in the kitchen. Then, six months later when the urge hits again and you are ready to turn out a dozen more loaves, you can begin afresh. Rye bread is very easy and forgiving. You may have read that yeast won't grow in a metal bowl, or has to be kept at 80F, or in the fridge, or fed every eight hours or every eight days. Nonsense. Yeast is a survivor, and will tolerate all kinds of abuse. The key to successful rye bread is to feed your starter long enough so that it bubbles furiously after a few hours at whatevertemperature your kitchen prefers. Then bake the bread. Mix the the starter in the dough before it is ready, and you are manufacturing bricks.
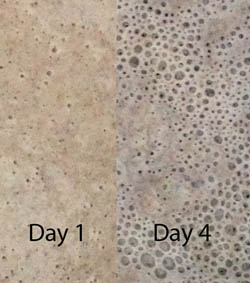
Whisk all the ingredients together in a bowl, cover with plastic wrap, and leave on the counter. This mixture will have the consistency of pancake batter. Then wait. And wait. It will take about 3-5 days for bubbles to appear in the liquid, depending on room temperature. Once bubbles first appear, its time to feed the starter. Don't worry- yeast isn't a fussy eater. Toss out about half of the starter (roughly a half cup). Then add in about 1/3 cup (60 gms) of rye flour. Plus enough water to restore the starter to its original pancake consistency. Whisk, cover and set aside. You don't need a measuring cup, estimating by eye is fine (if the starter is covered with a thin clear layer of water the next morning, you probably should use less water next time). The following day it should be pretty bubbly. Feed again as above, and repeat. Typically, in a few days the starter will bubble a half a day after feeding. And smell like fresh beer. Now it's ready for baking. The night before baking:
In a bowl at least twice as large as the batter, mix together with a spatula until uniform. The batter will be thick, like oatmeal. Cover and let sit over night. By morning the batter will be alive: 2-3x higher and spongy. If your kitchen is very warm and the doubling occurs in 6 hours, mix the dough in the morning and bake in the evening- you don't want the yeast to prematurely exhaust their food supply. Morning Preparation: Pre-heat oven to 325F Remove 2 tbs of starter if you plan on making another batch of bread in the next few weeks (more on this later). Fold into the batter:
Spoon batter evenly into two, non-stick 4.5"x8" bread pans. You can grease regular pans with shortening, but non-stick is a MUCH smarter choice- wet rye flour is like glue.
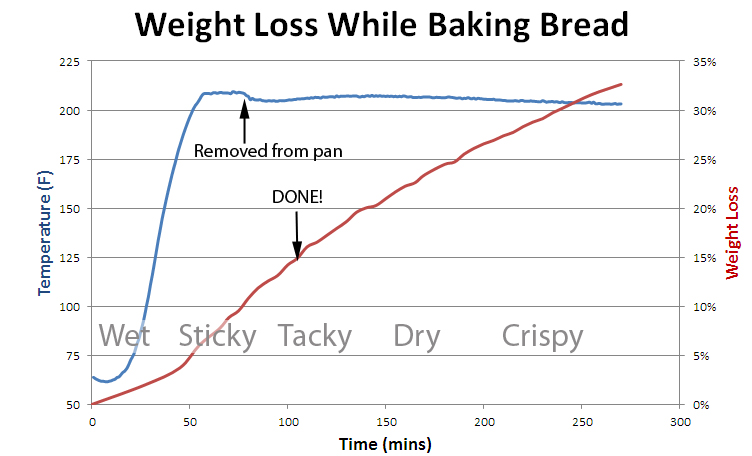
Cover with towel for around 2 hours- the batter will nearly double in height. For decoration, you can also sprinkle on some extra seeds or kosher salt after pouring the batter in the pan. Baking: Place both pans a few inches apart on the center oven rack and bake for an hour and 15 minutes. Remove from oven, slide out of the baking tins, and place back in the oven for an additional 30-45 minutes. The dough was initially very wet (around 45% water), and this assures the bread cooks evenly. Since the internal structure is already set by this point, the bread will not deflate, nor, given its density, cool off even slightly. How can you tell when the bread is done? All ovens are different and the temperature dial is often miscalibrated. Depending on how the rye was ground, water absorption varies. Plus the shape and size of baking tins are not standardized. So you can't simply "time" any bread recipe and expect consistent results. Instead, many people suggest tapping the side of the loaf and listening for a distinctive hollow sound. Or, by measuring the internal temperature. Or, by sticking a toothpick in the center and see if it emerges dry. But it turns out none of these methods are particularly reliable. Unlike a muffin, the crust will peel off wet crumbs sticking on a toothpick, disguising the internal tackiness. Sounding the loaf is an acquired skill, and even professional bakers tell me it sometimes leads them astray. Temperature is sometimes an acceptable indicator for a light, crusty-style loaf, providing "done" occurs before the temperature plateaus (see chart below). Most of these techniques can be made to work in one oven and for one baker who consistently follows the same recipe. But rarely the first time, every time. For this style of wet, no-knead bread, "done" is a specific humidity level, and the best way to know the bread is fully cooked is to weigh the loaf. Since flour doesn't evaporate, weight tells you how much water remains. In the name of kitchen science, I've modified a large toaster oven by cutting a slot in one side. This slot allows me to pass a cantilevered arm from a pivoted rack in the oven, through the oven wall, to a digital kitchen scale. After a bit of calibration, you can accurately weigh food + 1 gm while cooking. I used this apparatus to determine the best humidity level- but don't worry, you won't have to similarly mangle your oven. Just weigh the loaf near the end of cooking, per the instructions below:
Notice how the loaf's temperature (the blue curve) plateaus around 205F after 50 minutes1- but the bread still has an hour left to bake! This is why temperature is a poor surrogate for "doneness". On the other hand, the loaf's weight loss (red curve) uniformly increases over time. I find the best texture occurs when the batter has lost 15% of its original weight. So here is the technique.
Now bake the bread. After 75 minutes remove from the pan, and place back in the oven. You might weigh at this time (it's a good idea to place a trivet or foil covered sheet of corrugated cardboard on the scale to prevent heat damage). Then, around 1 hour 30 minutes total cooking time, weigh again (the brief time spent out of the oven will have no effect on the final results). Compare to your doneness target (around 700 gms). If the dough isn't dry enough, place back in the oven. Because the evaporation rate is pretty constant, you can actually estimate the remaining time given these two weight measurements and the time between measurements- but if not, just weigh every 5 or ten minutes2. And that's all there is to it3. If you like your bread drier or moister than me, adjust the 15% "done" criteria up or down a few percent. Let the bread rest at room temperature for a few hours for moisture to equilibrate, and for the brown crust to soften. Wrap tightly, and serve the next day or freeze. Easily keeps for a week at room temperature, if tightly wrapped.
I like Rugbrød with a thick layer of cultured butter and thin sliced cucumbers. Or cheddar cheese and marmalade. Enjoy! Reviving the starter: If you plan on making a few more loaves, add a 1/3 cup of flour and some water to the 2 tbs of retained starter, whisk until the consistency of pancake batter and place in a covered bottle or bowl in the fridge. Feed once a week, returning to the fridge instead of leaving on the counter. Then, when you are ready to bake more bread, follow the instructions but substitute the fridge starter for the packet of Goldrush starter. You may discover the mother starter bubbles sooner and faster than with dry yeast.
|
|
|
-------------------------------------------------------------------------------------------------------- Additional articles on kitchen science can be found HERE. 1 You may have noticed the temperature DROPPED by a few degrees after removing the loaf from the pan and placing back in the oven. The reason is evaporative cooling. By eliminating the metal loaf pan side walls, the exposed surface area increased by nearly a factor of 3. More surface area, more cooling. So the temperature dropped. For purposes of this experiment, I continued baking the loaf well past good sense and into bitter desiccation. The little bumps in the red curve reflect the oven cycling on and off, thus changing the evaporation rate. The evaporation rate is slower in the first 40 minutes because it takes that long for the interior of the loaf to heat up. 2 If you don't want to remove the loaf from the pan mid-way through baking, you can still enjoy the benefits of the weighing technique. Imagine the empty pan weighs 200 gms, and filled with dough 1025 gms. Subtract these two numbers and the dough alone weighs 825 gms. Multiply 825 gms by 0.85, and the finished loaf would weigh 700 gms. But, since the dough is still in the pan, the finished loaf IN THE PAN weighs 200 gms +700 gms =900 gms. In other words, the filled uncooked loaf pan weighs 1025 gms, and the finished loaf still in the pan weighs 900 gms, which is the weight you measure before removing from the oven. 3 Besides an accurate temperature control knob, kitchen ovens would greatly benefit if their racks were connected to a digital scale. The weighing technique described for Rugbrød also works brilliantly on white bread, pound cakes, rolls and even cookies. If you are mechanically adept, its easy to build a simple balance scale, that tips the loaf pan down once the target weight is reached. We even demonstrated, in a Rube-Goldberg apparatus, how weight loss is a good measure of doneness in a brisket:
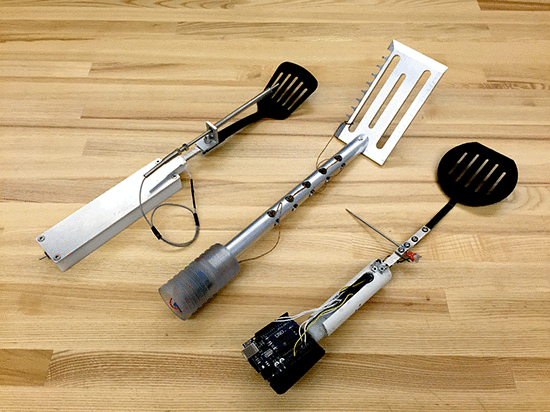
-------- At Boston University, we challenged a group of freshman and sophmore engineers to design a spatula that could weigh food during cooking. The process would starty by using the spatula to weigh a raw chicken breast before placing on a baking pan. Then the spatula software inputs the weight and oven temperature to predict when the chicken breast would be "done". A few minutes before the deadline, the spatula beeps, alerting the cook to take an additional weight meausurement, which then refines the software prediction. Finally, the spatula beeps when done. A few of teams not only built working (rough) prototypes, but actually put them to use, successfully cooking a meal. Something like this would make a great product....
(the probes on the sides or front can impale food to determine internal temperature) |
|
 Contact Greg Blonder by email here - Modified Genuine Ideas, LLC. |
 Sourdough Starter